Showing posts with label spray paint. Show all posts

Monday, November 12, 2012

I'm In Love... Again!

I'd like to introduce you to my newest love: Krylon Metallic Silver spray paint!


Yes, I know I'm risking sounding like the latest Bachelorette, professing my love to a new object-of-affection every week. It's just that there's so many things I love! But honestly, this one's serious, like head-over-heels, forever-and-ever! (Well, at least forever in Kim Kardashian time...) ;)

Okay, all joking aside-- Metallic Silver spray paint is my new BFF! Check out my Makeover Victim #1: this cutesy, colorful Dollar Tree owl!


Adorable, yes, but not really my style (I did, however, go back and get one to leave original for Princess's room, since she loved this one so much!)

 It took me forever to decide what color to paint him... first, I painted him glossy white, to match my owl twins (which totally washed out his features). Then I tried Krylon Hammered Silver, which turned out WAAAYY too dull and drab for my tastes.

So he got a coat of  Krylon's Blue Ocean Breeze, and stayed that way for a while. Until I decided he needed something more glamorous and neutral to fit with my fall decorating... and that's when I found the Metallic Silver!


Check out the cool crackled finish! I honestly have no idea what caused it-- whether it was the frigid garage temperatures that I painted him in, or the undercoating of Hammered Metal (possibly oil-based?) spray paint-- but I LOVE it! It looks like silver leafing!


Now meet Makeover Victim #2:


Just a plain, everyday, run-of-the-mill glass pumpkin candy jar, that cost me all of $1.99 at Goodwill! . But glamorous? Not on your life!

Enter Krylon's Metallic Silver spray paint.


I really wanted to turn into fake mercury glass, like Karianne's-- but my search for Looking Glass paint came up empty. :( So Metallic Silver it became-- and though it's not quite so shiny, I love my pumpkin's new glamorousness!


So there you have it: two totally different makeovers from one can! And now you can see why I love it so much ;)

So do you love spray paint as much as I do? Do you have a favorite go-to-color? Or maybe you're a spray paint newbie! Trust me, once you try it, you'll be hooked ;)

...at least for 72 days!


P.S. I have absolutely NO connection with Krylon or the people that make it-- although if they saw how much I love spray paint, they might consider it!


Tuesday, October 16, 2012

The Tale of Two Owls: A Spray-Paint Story

'Member the sad day when poor Owl-rick bit the dust? :'(

Well, ever since then, I've been searching for another sweet ceramic owl to take his place (albeit a higher, safer place this time-- out of reach of little grabbing hands...) Sadly, Target no longer had the little owl pencil holders. And I couldn't force myself to shell out $16 for a similar one from Anthropologie (though I seriously came close-- that's how badly I wanted an owl!)

I thought I had scoured every thrift store in the area, but last week I decided to stop at an out-of-the-way St. Vincent de Paul that I hadn't been to in a while (they also have exorbitantly high prices, for a thrift store!) Lo and behold, what to my wondering eyes should appear, but not one but TWO ceramic owl figurines!


Yes, twin brother owls, just waiting for me to adopt them, bring them home, and give them a makeover!!! No, they weren't exactly the same as my stubbier, chubbier Owl-rick, but they were OWLS, and they were adorably cute in their own way. And for the price of $1.00 each... well, how COULD I say no???

I knew what I wanted to do with them already: give them glossy white coats, just like the one I had given Owl-rick shortly before his untimely demise. So the next time I was at Walmart, I grabbed a 99-cent can of gloss white spray paint, and got right to work.


I decided to do a "test" to see if scuffing up the surface made a difference in how well the paint adhered. I used a scuff pad to rough up one of the owls, and left the other untouched (neither of them had a really shiny coat to begin with).  It seemed like both of them took paint just as well-- they both required about four coats to completely cover their "dark past" (one can of spray paint just finished both owls)

I did learn an important spray painting lesson, though... I was wondering why, like the time I painted my wicker basket chair, the spray paint only seemed to stick to some parts and not others! Then I realized that I was holding the spray can only 4-6 inches from the owls, and the air from the spray was actually "blowing" the paint out of the crevices that I was trying desperately to fill!  Lesson learned: hold the spray paint can about 12 inches from the object you are trying to paint, and let the paint "mist" onto the object, instead of "blast"! Maybe it wouldn't have taken four coats if I'd have sprayed it right from the beginning! LOL!

(Want more spray-painting tips? Check out my other spray paint projects here)


So the twin brothers are now great white owls! They currently grace the TOP SHELF of my dining room bookshelf. My littlest monkey is fascinated with them, however-- he stands in front of the shelf and makes "hooting" noises at them! :)  It's a good thing he can't reach these guys!

Fittingly enough, the day after I finished my pair, I spied these at One Kings Lane:


For only $19.00 for the pair, I might just have bought these in my previously owl-desperate state. But I think I like my price of $3.00 (including spray paint) a lot better!


I'm still trying to think of appropriate names for them, though... Hooty One and Hooty Two?  Screech and Scratch? (Sounds too much like Cheech and Chong...) *sigh* Guess I'll just have to wait for the right inspiration to strike..

So have you done any thrift store rescues lately? Any spray paint makeovers? Got any name suggestions for my owly pair? Let me know!


Monday, August 20, 2012

A Basket Case (Basket Chair Makeover)

Remember my chair post a week ago, when I showed you the newest thrift-store addition to my Home for Soon-to-be-Rehabbed Chairs? (aka the Half-way House… )

Since I haven’t yet gotten my dream house with deep, fluffy, curtained window seats (like this one or this one), I had great visions of turning him into a comfy reading hideaway!


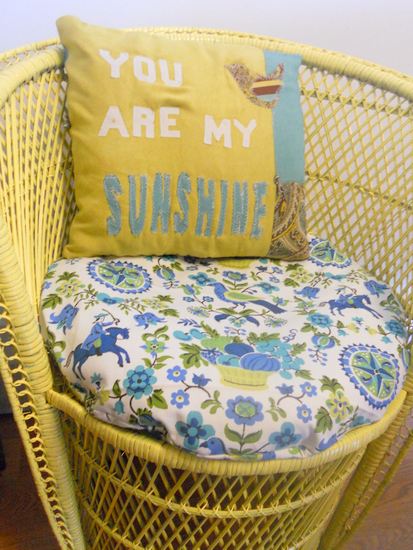
One can of gray spray primer, and four cans of Krylon Bright Idea Yellow later, he was ready to take his place in the real house! This is how he looks now, all “cozied up” in his new home:

A few wicker painting tips:

1)      Use a spray paint with primer built in (I doubt it would have taken four cans if I had done this!)

2)      If you do choose to do an initial primer-only coat, use a primer color that corresponds with the shade of your final paint color (i.e.  if your final color is going to be yellow, use white instead of dark gray primer!)

3)      Forget the “many light coats” rule that usually applies when painting furniture… go thick and heavy! This is one case when runs are not bad! After three cans of “light coats” that only touched the same parts each time and left the rest bare, I went thick and heavy with the fourth (and thankfully, final) coat—spraying it heavily enough so that it ran down the caning and filled in the cracks. TADA-- coverage achieved!!!

This is what the corner of my dining room looks like. You’d never know that, tucked in between the piano and the bookshelves, is a secret reading space!

I love my new reading nook!  


P.S. I am also loving my new “You Are My Sunshine” pillow! Check out how I made it (out of a recycled quilt!) here.

Monday, August 6, 2012

Target Envy/ The Wise Old Owl


I have a confession to make.
I have a bad case of Target envy-- being jealous of all the fabulous stuff my fellow bloggers have been finding at Target.  Apparently Target has become the style capitol of the megastore world.  From drool-worthy lamps, and gorgeous rugs, to bedding that rivals/replicates fancier, much more expensive designer styles, what isn’t there to like?
 The problem? We don’t have a Target around here! :(
Most of the time, I manage to console myself with the thought that I really can’t afford any of it anyway. J Honestly, it’s much better for me (and my budget) that we don’t have one any closer than an hour’s drive (which is a drive we rarely, if ever make… thank goodness for my pocketbook) At least, so I’ve been telling myself…


That is, until Bonnie posted a picture of this adorable ceramic owl that she found at Target for $2.50. Okay, even my pocket change budget could handle this adorable fella! (It didn’t help that it is the spitting image of this white one from Anthropologie-- which costs, ahem, $16.00… see how much I’d SAVE by buying it at Target?) I REALLY needed wanted one of these guys!

So when my trip to Indiana took me into Target territory, I knew what I had to do.

Lo and behold, after digging through the dollar bins, I found the LAST ONE—in black, with multiple chips on his poor little noggin. No prob—I knew he’d be soon encountering my trusty sidekick, Mr. Spray Paint (this, however, did not stop me from asking for—and receiving—a 10% discount for damaged goods! That’s right, I bought this fella for $2.25!)
The hardest part was deciding what color to paint him. Do I go for white, like the original one I fell in love with, or for a zippy color-- like my newly-beloved aqua, or the quintessential favorite, bright green?

I finally decided to go with Rustoleum Apple Green. (After all, I can always give him another makeover later, if I really want the white!)


Doesn’t he look fabulous?


And, for now at least, my Target envy has been salved. :)


And every time I look at him, he reminds me of the lesson of the wise old owl…
A wise old owl sat in an oak
The more he saw, the less he spoke
The less he spoke, the more he heard
Why can’t we all be like that wise old bird?
-- Nursery Rhyme
 
P.S. If you would like to download a frameable copy of the "Small Things, Great Love" quote, click here!


Thursday, June 21, 2012

Primitive to Pretty- Shaker Box Makeover

I fell in love with these reproduction Shaker boxes/bandboxes/cheeseboxes/hatboxes (or whatever else you want to call them) at my local GW a year or two ago, when my style was "darker" and more formal. (The tag on the bottom of the stack shows that someone paid $34.99 at one of our local mom-and-pop “high-end” accessory shops, but they only cost me $1.99 apiece!) Now with the coming of summer, and our "new-to-us" lighter green sofa set, they didn't really fit in. They were actually headed to my garage sale pile, when I realized that I might actually be able to update the drab colors to something that fit with my lighter, brighter summer palette!
Enter the universal champion of all DIY-ers everywhere: SPRAY PAINT TO THE RESCUE! A couple coats of spray paint later (Rustoleum Apple Green and Krylon Blue Ocean Breeze-- I left the navy box alone to "ground" the trio), and my primitive bandboxes have joined the 21st century!

A little distressing around the swallowtail joints (yes, I had to Google it to find out what exactly they were called), and they look like they've always been that way!


And the best thing was  I already had both cans of paint, so the total cost of this makeover was FREE!  (My favorite price!) So before you throw that outdated accessory away because it no longer fits your style, consider what a bit of spray paint could do! But be careful-- it's addicting!

Now if you'll excuse me, I have to go spray paint my house... :)


P.S. Speaking of spray paint, my 99¢ chandelier is finished! (it's just waiting for Mr. Superman to have time to hang it up!) I'll give you a hint of what it looks like now:

Monday, May 14, 2012

Happy Monday! / Chalkboard Flower Pots

Happy Monday, fffffolks!  Yes, the beginning of a brand-new week is upon us! Is it just me, or does this month—okay, this whole year—seem to be flying by at a break-neck pace? Anyway, I promised to show you the gifts our church gave to all the mothers for Mother’s Day!

These cute little flowerpots were only $0.78 apiece at Walmart.  I sprayed them with two coats of Krylon chalkboard paint ($3.70 for one can, which painted all 12 = $0.31/apiece).  

(Side note: I am officially in LOVE with chalkboard paint! J I’ve seen so many cool projects made with it, and I can’t wait to use the leftovers on a really neat project I can’t wait to show you!) Anyway, the next step was hot gluing a ribbon band & bow ($4.32 for 9 yards = $0.36 per pot) around the top of each pot.

I put my kiddos to work coloring each pot with chalk, then erasing it (the required step before you can write on the new chalkboard surface). Each pot reads, “Mothers plant the seeds of love”—though they can easily erase it and write whatever they want on it.

Inside each of the chalkboard flower pots is a pot of chrysanthemums ($0.98 each) with a special Mother’s Day tag, and a silk flower pen. The flower pens were a crazy easy project (so easy I actually had my Sunday School girls make some for their moms on Sunday morning!), and only cost $4.00 for the twelve (including the pens, silk flowers, and floral tape), or about $0.33 apiece!

All together, each adorable Mother’s Day gift cost only $2.76! Crazy, eh?


So, what do you think? Did you make any special crafts for Mother’s Day?