Monday, November 5, 2012

Pumpkins and Family Pictures!

Last Sunday we had Family Picture Day at our church. Nothing fancy, just some pumpkins from our church's pumpkin patch in the front yard of the church for a backdrop, and yours truly as the "photographer" du jour.

It was the perfect day for outdoor pictures, gorgeously sunny, if a bit nippy! It actually turned out to be the last beautiful day we've had, since we started getting nasty weather (including the very very outskirts of Hurricane Sandy).

But the best part? In between taking pictures of the church families, I got to snap some pics of my sweet little kiddos!


Little Princess was the first to have her picture taken, and she wasn't at all sure that she wanted it!


My handsome Mini-Superman didn't mind posing, though!


When did my first baby turn into a sharp little man? :0


Even my littlest monkey sat still just long enough for me to snap a couple pictures!


Some of the church kids were begging to use the camera, so we even got a few snapshots of the whole family! :D


Isn't my Superman handsome? ;)


(There may or may not have been a promise of a special treat from Daddy to Princess for smiling!)

A funny story about these pictures: I took them to Walmart to have them printed (we gave a copy to each person that had their picture taken), and the kid working the photo counter (okay, he was MAYBE 20 years old) got all uptight-- I think he thought I was printing some other photographer's copyrighted pictures! 

He flipped through the pictures, then pointed to one and asked me very seriously, "Can you tell me who took this picture?" "Uh, me," I replied. He got even more uptight... "THIS one???" He was pointing to our family picture (which obviously had me in it)... "Ummmm, one of the other kids took that one... but I took the rest!" You could tell he TOTALLY didn't believe me, but thankfully he gave them to me anyway! :) Maybe I should have offered to show him the originals on my little $50 point-and-shoot camera? LOL

Speaking of, does anyone have any photography tips for getting good INDOOR pics with a plain-Jane point-and-shoot camera? That seems to be what I'm having the hardest time with-- getting good pictures of projects and furniture makeovers (especially since the lighting in our north-facing parsonage/apartment leaves a LOT to be desired!) I've tried the whole just-drag-it-outside-for-pictures thing, but even in the summertime the weather can be iffy-- and you can totally forget about that in the winter (unless pictures of an object buried in snow are your thing!)

So did anybody else get any nice fall family pictures in before the weather got nasty last week? Are you having a hard time coming to grips with the fact that it's already November, like I am? I am soooo not ready for winter to be here! :) But I am looking forward to Thanksgiving, and hunting season! (I hope I can get a nice buck this year! We love venison!) So, I guess I'll go ahead and say it: Happy November, y'all!


P.S. Check out my "Project Gallery" up on top bar, and see if there are any projects you've missed!

Wednesday, October 31, 2012

I Rescued My Kitchen Cabinet (In 15 Minutes or Less!)

As much as I love decorating, you'd think that I'd enjoy cleaning as well! Unfortunately, cleaning-- at least the regular, every-day, clean-it-even-if-it's-not-obviously-dirty kind-- is the bane of my existence. I do enjoy taking something that's clearly a mess and whipping it back into gleaming, organized shape-- sadly, this means that I generally end up waiting till things are obviously dirty before I notice them!

Case in point: my under-sink kitchen cabinet:

Yep, keeping it real, folks!

Yes, it definitely needed a rescue! The clutter is obvious-- what's you can't see in the picture is the black, slimy, grimy cabinet floor!  Thankfully, Flylady has taught me that I can do ANYTHING for 15 minutes-- even cleaning out an extremely cluttered, DIRTY cabinet!


I emptied everything out of the cabinet and threw away everything I didn't need-- musty, dried-up sponges or rusty Brillo pads, anyone? Then I set out to conquer the white-turned-black shelf (the picture above was taken when I was about halfway done!) Soap and water just weren't doing the trick, so I turned to my secret non-abrasive cabinet-cleaning weapon: baking soda!

Baking soda is a great scrubbing agent for anything that you don't want to scratch: cabinetry, furniture, refrigerator shelves, stovetops (especially glass ones), and more.
(Just make sure to rinse it off thoroughly so it doesn't leave a white film on the glass)
Pin It!

Once the shelf was returned to its original cream-colored state (one thing kitchen designers DON'T tell you is how HARD it is to keep white or light-colored cabinets looking clean!), I tried to find a way to reorganize everything in a sensible manner. You see, in a sensibly organized cabinet, putting something away RIGHT will only take, at the most, a few seconds-- leaving me with NO EXCUSE for NOT keeping things neat!


I folded all the paper bags in half and put them all inside one large paper bag (I use paper bags for discarding broken glass items safely-- such as my poor owl-- as well as for craft purposes). The large cleaner refill bottles also got put in the back, since they don't get accessed as often. The wire shelf (which was already there-- just not being put to use properly!) holds my frequently-used spray cleaners, and the trash bags fit perfectly underneath!

(Sorry about the terrible quality on this pic-- I snapped it with my cell phone because my camera is currently on the lam :( If you think about it, please pray that I can find it by Saturday!)
Since I don't use my dish drainer for its intended purpose (I wash my dishes under running water and stack them on the countertop for immediate drying-and-putting-away-- otherwise they just pile up and give me a headache!), I decided to turn it into an organizer, as well! The silverware cup holds the few sponges and scrubber pads that I kept. The red basket holds my plastic shopping bags (which I use mostly for dirty diaper disposal ;) ), and my Swiffer pads fit perfectly along the end of the plate rack!


With all the extra room I created, I had enough space to store my cookie sheets in here, too! It is the only cabinet tall enough to hold them standing up. In the past, I was stuck on keeping them in the same cabinet with the rest of my pots and pans-- even though they had to be kept laying down, with the rest of the pots on top of them (causing continual slipping, sliding, and disarranging of the pots and pans as well). Now they have their own place, where they don't get scratched, and the pots are nice and neat as well!


Pin It!

Tada! A neat, CLEAN undersink cabinet, in 15 minutes or less! Thank you, Flylady! (She's also got a wonderful list of daily cleaning routines, that I'm working on mastering, so things don't get so bad again!)
So have you done any reorganizing lately? Any crisis cabinet cleaning? Any repurposing of dish drainers as organizers? Or moving things (like baking sheets) around into places that actually make more sense? ;)


P.S. Check out my new "Project Gallery" up on top bar, and see if there are any projects you've missed!

Friday, October 26, 2012

Neutral Autumn Bookshelf Reveal

It's finally here! Yes, I'm finally getting around to show you my decorated-for-fall bookshelf! (And yes, it's almost winter here...)

I've already done a few tweaks since I showed you that "sneak peek" last week (hey, that rhymes! Ok, Kathryn, no need to be such a dork...) But I'm sure I'll be doing plenty more, so I've gotta just suck it up and show it to you now, or I never will!


If you were here last week, I showed you the "Pumpkins, Apples and Hayrides" sign that I made for the top shelf. (Click here if you want to download your own copy!) You also saw the makeover of my two beloved owls, whom I have now christened Owlexander and Owlbert (thanks to my fabulous sister for the name suggestions!) They now guard the house from the top shelf (and stay out of reach of my Little Monkey!)


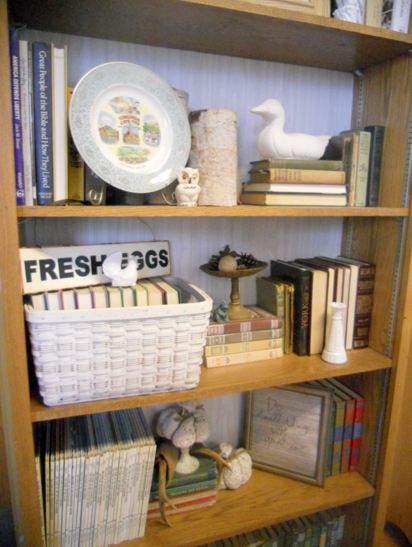
Though I didn't really start out with a theme (other than "neutral" and "nature"), it kind of developed into an "fowl" theme-- as you can see, there are birds everywhere! My owl twins are kept company by a white ceramic duck (found at Goodwill), a cream-colored owl salt shaker (from the Habitat for Humanity thrift store), and a white "turkey" salt shaker (shhhh... actually he's a rooster, but we're pretending he's a turkey for Thanksgiving... please don't call "fowl" on me!)


I found the aqua and gold Virginia City plate at my local Goodwill-- the aqua perfectly matches my chalk-painted dining room console table! And I have fond memories of visiting Virginia City with my family growing up, so I love it! The birch candleholders came from a garage sale-- I think I paid $2.50 for the set?


More thrifted things continue on the next shelf: the white book basket, "Fresh Eggs" sign, the little green squirrel, and the birdbath soap pinecone holder all came from Goodwill (all collected over time!) Are we sensing another theme here? :)


On the fourth shelf (the easiest for my Little Monkey to reach), I try to keep only the most unbreakable of decorations: sweater pumpkins (I tried to copy these, but they kind of came out lumpy-- or maybe that's from being used as footballs by a 14-month-old!) on an already-distressed metal candlestick, deer antlers (from my first, and so-far ONLY buck that I've shot... yes, I'll be going hunting again this fall!)...


and a glass-less frame with another printed quote (find the original post here).


So there she is-- my Autumn Neutral/Nature/Bird-themed bookshelf!

Pin It!

Have you decorated with a theme at all this year? Do you like to go all out with bright color for fall, or do you prefer more subtle, neutral autumn decor?


P.S. Check out my new "Project Gallery" up on top bar, and see if there are any projects you've missed!