Whew! What a week! I feel so bad for not having posted since
last Monday… but I don’t regret a week away from everything with my sweetheart :)
Hubby and I actually got to have an entire week of just the two of us—without
kiddos! Woohoo! They went to Grandma’s while we took our church youth group to
a Christian teen conference, and then went to my brother’s wedding! This is the
first time we’ve been away from them for more than a day… but we had a blast anyway
:)
Remember in my last post (about my beloved Union Jacques) I
told you I had finished three projects in one day? Well, I’ve been dying to
show you the other ones… So here’s Project #2!
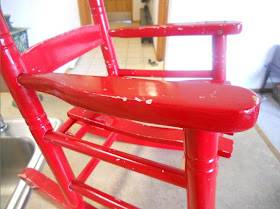
The grandparents had bought my kiddos a pair of these little
rockers for Christmas two years ago... and they had definitely seen better
days! One chair was broken beyond repair, so I disassembled it and stashed the
parts for a future project (shhhhh... Don’t tell my husband!) ;) The other
chair was still in pretty sad shape. One of the chair slats was broken off, and
the shiny paint finish was chipped and peeling.
Because of the oiliness of the finish, I wasn’t sure whether
regular paint would even stick to it or not. So I grabbed my trusty standby:
CHALK PAINT! (The leftovers from my console table project—it stores very well
in a sealed Tupperware container… just add a tad more water when you’re ready
to use it again!)
I literally painted this fella on my kitchen counter, right
before bed-time! :) It took two coats to completely cover the red, but it did
the job! (So far, this chalk paint has lived up to its “stick-to-anything”
reputation—I tell you, I’m addicted to this stuff!) It still looked like it was
missing something, though… and literally in my sleep that night, I realized
what it needed! (Anyone else dream about their projects… or am I the only
crazy/obsessed one?)
I sanded the chalk paint smooth, then taped off the two
center slats, and a matching stripe on the chair back and front. (Sorry, no
measuring here, either… I am a proud member of the Eyeball-It-All-the-Way
Club!) I also taped off the round ball finials on the top. Then I dry-brushed them
in with regular semi-gloss white paint, to create a slightly-worn,
intentionally imperfect, beachy stripe!
Doesn’t it look like it belongs on the porch of a beach or
lakefront cottage?

Parties I link to:
Sunday:Monday:
Tuesday:
- Adventures Of a DIY Mom: Terrific Tuesdays
- Mercy Ink Blog: All Things Heart & Home Link-up
- My Uncommon Slice of Suburbia: Tuesday's Treasures
- Uncommon: Uncommonly Yours Link Party
- The Winthrop Chronicles: Share It Link Party
- Embracing Change: Creative Inspirations Link Party
- Hooking Up w/ House of Hepworths
- Vintage Gwen: Show & Share
- Chic on a Shoestring Decorating: Flaunt It Friday
- Decorating Insanity: Furniture Friday
- Five Days, Five Ways: Feature Friday Free-for-All
- Miss Mustard Seed: Furniture Feature Friday
- Two Sasters: TGIF Party


Oh my goodness - adorable!! Great job!!! :) as usual :)
ReplyDeleteI love the chair makeover! This beachy blue color is my favorite right now - I'm redecorating my bathroom in this color. Visiting from Terrific Tuesday linkup :)
ReplyDeleteSuper cute makeover! Please come hang out and link up to our link party "Home is Where the Heart is" Please feel free to link up any posts you might want to share! :)
ReplyDeletehttp://www.homesteadsimple.com/home-is-where-the-heart-is-link-it-up-wednesdays-3/
That is so cute! Love the idea of using chalkboard paint. Sanding that thing down beforehand would have been a headache! I'll have to remember that for my projects.
ReplyDeleteElizabeth
http://lizziscreations.blogspot.com
I love the color that you painted this chair! Thanks so much for sharing on Marvelous Mondays!
ReplyDeleteJulie
So glad you had fun with your hubby ... and I have to agree your rocker makeover looks oh so beachy!
ReplyDeleteThanks for sharing at our Crazy for Color link party!
:)
Linda
www.itallstartedwithpaint.com
Love it! That nautical stripe is just perfect! I appreciate you linking up to our party!! :)
ReplyDeleteLove the white stripe running down the center!! So glad you joined our Color party!
ReplyDeleteKelly